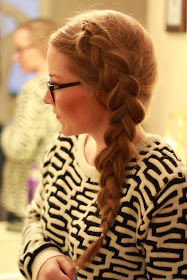
I've gotten so many questions about how to do this dutch side braid that I decided to make a tutorial on it for you all! If you have anymore questions, feel free to ask!
This is what my hair looked like before I started.
To help my hair have more volume, I use Tresemme Dry Shampoo. I also use Tresemme Heat Tamer Spray before I use any heat products on my hair.
Before I start the braid, I straighten the top layer of my hair. It just allows for extra smoothness of the braid.
I also use Chi Silk Infusion after I straighten my hair to help with smoothness. If you have never tried this product before, it works wonders on both straight hair and curls.
I also like to give my hair a little bit of teasing before I start the braid. I have very fine hair, so I always add a little bit of tease to my hair. I keep it in place with Aussie Mega Hairspray.
You can see in this picture how the layers underneath are not straightened.
Once you get your hair smoothed out, pull it to the side, and make a part just behind the ear so that you have a front section (very small), and a back section.
Once you have made your sections, take a small piece of hair at the top that is between the two parts. You will start the braid here.
In order to make the dutch braid, you will weave your hair under instead of over, adding sections each time just as with a normal french braid.
Continue the braid down the side, staying behind the ear with it and keeping it tight.
Your braid will be very tight at this point. Continue braiding all the way down and tie it off at the bottom.
This is what your braid should look like at this point.
From the back, you can see how far back it is.
Now you can start pulling apart each section of the braid. Loosening it up adds volume to the braid and makes it appear thicker.
Continue to loosen up the braid all the way up until you have it as loose as you desire.
I like my braid to be very loose, so I make sure to stretch each piece individually as much as I can and still keep the braid together.
If you have any questions, feel free to ask! I hope this helps you with your next side dutch braid!
God Bless!
Hannah
Linking up with: Walking in Memphis in High Heels, The Fashion Canvas, Style Elixir, Induffinitely Me, Style Nudge
Linking up with: Walking in Memphis in High Heels, The Fashion Canvas, Style Elixir, Induffinitely Me, Style Nudge


Your hair is just amazing! The braid looks great on you. Unfortunately my hair is too short to do this so I will just have to admire yours!
ReplyDeleteGina - On the Daily Express
Oh, this is too cool- you rocked this look out, doll!
ReplyDelete-Ashley
Le Stylo Rouge
Love this so much and it looks way too cute on you, we'll have to give your tutorial a try. Thanks so much!!
ReplyDeletexx 365Hangers
This is so cute! Definitely putting it on my list of hair styles to try!
ReplyDeletexo Kylie
www.dressinsparkles.com
Love it! I do this to my hair all the time with a fishtail but never just a dutch braid, going to have to try it!!
ReplyDeletewww.amemoryofus.com
You have such pretty hair and your braid is beautiful! Thank you for linking up with SHOE AND TELL on Style Nudge!!
ReplyDeleteCherie
http://www.stylenudge.com
You have an amazing hair for this braid hairstyle. I have tried the Chi infusion - it's a great product!
ReplyDelete-Tatiana
We Shop in Heels